OpenVPN
These are some notes on how I manage OpenVPN.
Overview
At home I have a Buffalo WZR-HP-G300NH router between my network and my Comcast cable modem. (I used to use a RouterBoard; the version I had was a single board computer with 3 ethernet ports running OpenWRT.) It's still performing the same function but it's at someone else's home now.
I run OpenWrt and OpenVPN on the router. At work I run OpenVPN on a Linux server.
My Buffalo router is configured to keep a connection up to the work server at all times, and to route home traffic seamlessly across the connection to work, so that basically I always have access to all work resources from my home network. (And vice versa.)
The work server is configured to allow connections from my home network, and from any other employee who wants to have access.
Most of the other employees use a client that runs on Windows so when they connect, they are hooking up just the one machine to our work network. I also use a set up like this on my Macintosh when I am on the road.
I also use OpenVPN to secure the connection between my network and HuPI.org which is a virtual server located somewhere in the Cloud. The following notes are to help other HuPI.org users get connected.
The basic concept of OpenVPN
You install an OpenVPN client and a set of keys on your computer. When you run the client, it creates a virtual network interface on your computer and connects it via an encrypted "tunnel" to our server at AGI.
When your computer needs to talk to a computer on the other site of the connection, the packets are sent through the tunnel. The OpenVPN software takes care of encrypting packets as they enter the tunnel and decrypting them on the other side as they leave the tunnel.
When the connection is in place, you get direct access to any resource that you'd be able to reach inside the office - including all file servers, desktop systems, telephones, and printers.
All data is encrypted when it is passing over the Internet. Anyone spying on the traffic out on the Internet sees only the encrypted data, but any program running on your computer sees just another normal network connection.
Set up notes for Windows clients
These are notes for users. If you are the network administrator skip ahead for information on creating the special files. This doc assumes that the sysadmin has generated a set of files for your personal use ahead of time, and put them on a shared file server in a known location.
You can download an OpenVPN client directly from the Internet at the Community OpenVPN page but will still need our special server key.
Installation
- Run the openvpn installer that you will find in the folder.
- Copy the files ourdomain.ovpn and ca.crt to C:\Program Files\OpenVPN\config\
- Get your own personal key files (client.key and client.crt) from the subfolder named after you. Put them in the config folder as well.
Usage
- Windows XP - Double-click the OpenVPN GUI to launch it. (This adds an OpenVPN icon to the tray, you won't see much happen.)
- Windows Vista or Seven - Right click the icon and tell it to run as Admin. (This adds an OpenVPN icon to the tray, you won't see much happen.)
- Right-click the OpenVPN icon in the tray and select "Connect". This should bring up the VPN tunnel.
- When you are done using AGI resources you should right-click / disconnect.
(Leaving it running all the time is a security hole.)
When the connection is running you should be able to access any system on the AGI network.
Macintosh: There is a compatible client called TunnelBlick available for Macintosh users. I have gotten it going but have not written it up here yet. It's very similar in that you have to drop the same config files into a folder on the Mac.
Set up notes for Linux clients
Step by step, Ubuntu or Debian or Mint
1. Install the software. Client or server, it's the same. Configuration determines if you are a client or server.
sudo apt-get install openvpn
sudo apt-get install network-manager
2. Request keys from me. I will generate them and send them to you. Create a folder to hold your keys.
sudo mkdir /etc/openvpn/keys
Unzip the file I will send you
unzip ~/hupi_openvpn.zip
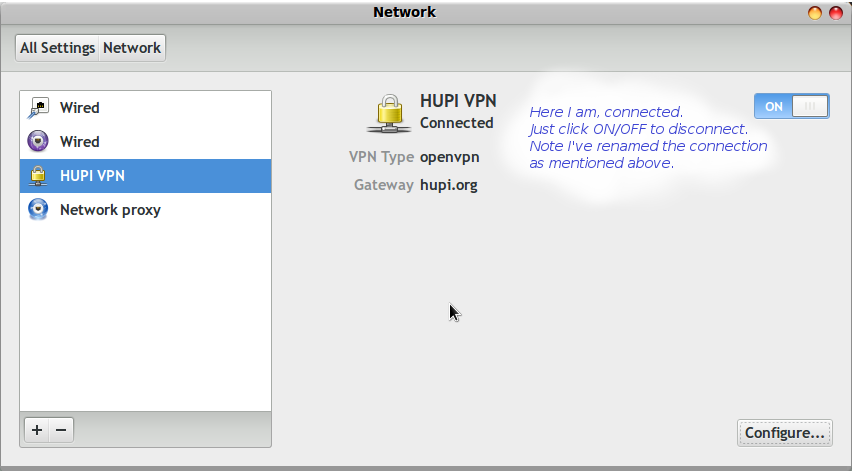
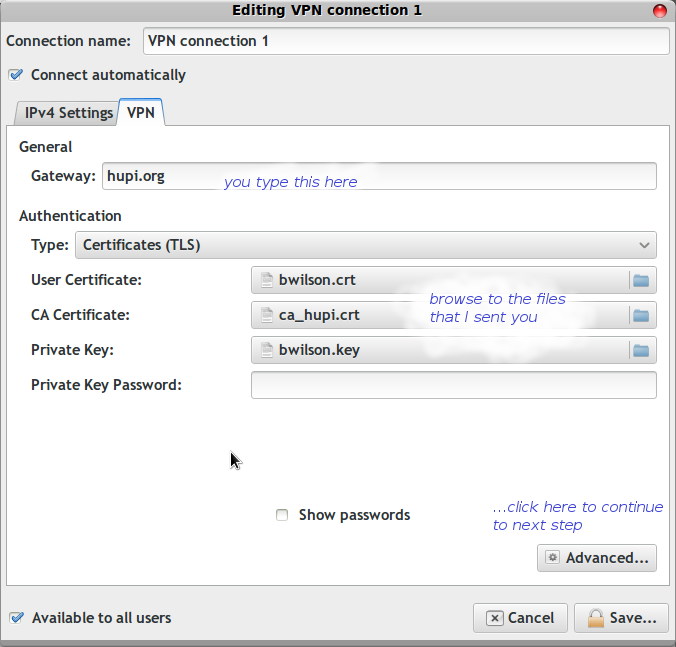
In the Network Manager control panel, select the VPN tab. Create a new VPN connection ("Add" button) Point it at the key and certificate files from the zip.
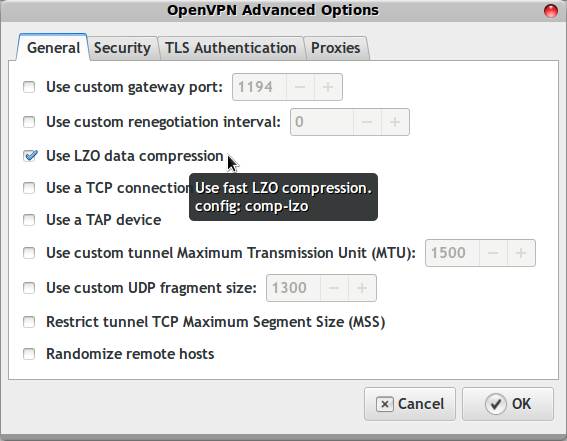
Under Advanced there are two more changes, compression and tls. Turn on LZO compression
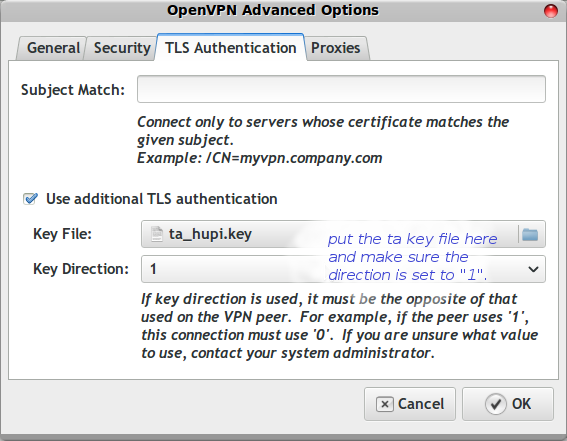
Point the TLS entry at the file I sent
Gory details for sysadmins
These are notes for your friendly system administrator.
Debugging a connection
On a Windows client in a command window, do ipconfig /all. This is the output from a desktop machine.
Microsoft Windows XP [Version 5.1.2600]
(C) Copyright 1985-2001 Microsoft Corp.

C:\Documents and Settings\bwilson>ipconfig /all

Windows IP Configuration

      Host Name . . . . . . . . . . . . : Umatilla
      Primary Dns Suffix  . . . . . . . : ourdomain.com
      Node Type . . . . . . . . . . . . : Broadcast
      IP Routing Enabled. . . . . . . . : No
      WINS Proxy Enabled. . . . . . . . : No
      DNS Suffix Search List. . . . . . : ourdomain.com
                                          crestviewcable.com

Ethernet adapter Wireless Network Connection:

      Media State . . . . . . . . . . . : Media disconnected
      Description . . . . . . . . . . . : Intel(R) PRO/Wireless 3945ABG Network Connection
      Physical Address. . . . . . . . . : 00-1C-BF-A3-84-40

Ethernet adapter Local Area Connection:

      Connection-specific DNS Suffix  . : crestviewcable.com
      Description . . . . . . . . . . . : Intel(R) 82566MM Gigabit Network Connection
      Physical Address. . . . . . . . . : 00-1C-25-72-5F-65
      Dhcp Enabled. . . . . . . . . . . : Yes
      Autoconfiguration Enabled . . . . : Yes
      IP Address. . . . . . . . . . . . : 192.168.0.2
      Subnet Mask . . . . . . . . . . . : 255.255.255.0
      Default Gateway . . . . . . . . . : 192.168.0.1
      DHCP Server . . . . . . . . . . . : 192.168.0.1
      DNS Servers . . . . . . . . . . . : 64.77.202.9
                                          69.60.160.196
                                          68.87.69.146
      Lease Obtained. . . . . . . . . . : Tuesday, May 25, 2010 8:16:07 AM
      Lease Expires . . . . . . . . . . : Friday, May 28, 2010 8:16:07 AM

Ethernet adapter Local Area Connection 2:

      Connection-specific DNS Suffix  . :
      Description . . . . . . . . . . . : TAP-Win32 Adapter V9
      Physical Address. . . . . . . . . : 00-FF-66-21-BC-21
      Dhcp Enabled. . . . . . . . . . . : Yes
      Autoconfiguration Enabled .
Creating a key bundle for a new client system.
This is what I do to create the key pair that I give you.
1. Log into the OpenVPN server and 'su' to get root access. 2. Do this:
cd /etc/openvpn/easy-rsa
source vars
3. Run the command "./build-key client" where client is the client's name, like bwilson or jsmith. You can accept most of the defaults in this command. 4. Use the client's name (eg bwilson) when it asks for "Common Name". Say yes when it asks if you want the key signed. Say yes when it asks for commitment. 5. Bundle the files for the remote user.
make_bundle bwilson
6. Email the encrypted file to the user as an attachment.
mail -s "Your keys to HuPI.org" useremailaddress < instructions.txt
The script to make a bundle looks like this:
#!/bin/bash
VPNUSR=$1
if [ -z "$VPNUSR" ]; then
  echo "usage: make_bundle username"
  exit -1
fi
echo Building bundle for $VPNUSR

if [ ! -f "keys/$VPNUSR.key" ]; then
  echo "No key exists for $VPNUSR, did you make keys yet?"
  exit -1
fi

SSHKEY=/home/$VPNUSR/.ssh/id_rsa.pub
if [ ! -e "$SSHKEY" ]; then
  echo "$VPNUSR does not have an SSH public key in $SSHKEY."
  exit -1
fi

if [ ! -d hupi_openvpn/keys ]; then
  mkdir -p hupi_openvpn/keys
fi

cp hupi-client.conf hupi_openvpn
echo cert keys/$VPNUSR.crt >> hupi_openvpn/hupi-client.conf
echo cert keys/$VPNUSR.key >> hupi_openvpn/hupi-client.conf

cp ../ta_hupi.key hupi_openvpn/
cp ../ca_hupi.crt hupi_openvpn/
cp keys/$VPNUSR.crt hupi_openvpn/keys/
cp keys/$VPNUSR.key hupi_openvpn/keys/

rm -f hupi_openvpn.zip
cd hupi_openvpn
zip -r ../hupi_openvpn.zip *
cd ..
rm -rf hupi_openvpn/*
ls -l hupi_openvpn.zip
The client template file looks like this
client
dev tun
proto udp
tls-auth 1
remote hupi.org 1194    name of the server you are connecting too
resolv-retry infinite
nobind
user nobody
group nogroup
persist-key
persist-tun
ca keys/ca_hupi.crt
comp-lzo
verb 3
mute 20
Network config details
The main OpenVPN server is at 10.8.0.1
By default OpenVPN will create a point to point link for each client from a pool in the same subnet, for example 10.8.0.13 and 10.8.0.14. From the client you can always see the OpenVPN server at 10.8.0.1 It's possible to nail down the client to a particular subnet if you want two way connections so that you can get access to your home machine from the office.
Server set up
Currently the main file server (running Linux and Samba) is running as a OpenVPN server, so that outside workers can get a VPN connection into our LAN. In the meantime there are NAT rules to make routing work on Kilchis.
On the file server you need to adjust these files
/etc/openvpn/server.conf
/etc/dnsmasq.conf
/etc/network/interfaces
/etc/network/firewall.sh
/etc/openvpn/server.conf
At work, I run network numbers in the range 10.1.10.x. At home I use 192.168.123.x. The OpenVPN connections are 10.x.x.x, usually 10.8.0.x but for my own connection I use 10.128.x.x
Here are the parts I changed / added. I run everything over UDP so I have "proto udp" uncommented. I use the 'tun' device so I have the "dev tun" line uncommented.
# Certificates and key
ca ca.crt
cert ourdomain.crt
key ourdomain.key  # This file should be kept secret
# At work - internal LAN
push "route 10.1.10.0 255.255.255.0"
# Brian Wilson at home (see also ccd/bwilson)
route 10.128.0.0 255.255.255.0
# Certain Windows-specific network settings
# can be pushed to clients, such as DNS
# or WINS server addresses.  CAVEAT:
# http://openvpn.net/faq.html#dhcpcaveats
push "dhcp-option DNS 10.8.0.1"
push "dhcp-option DOMAIN ourdomain.com"
Troubleshooting
Check the contents of the /etc/openvpn/openvpn.log and openvpn-status.log files.


